DIY Children’s Hand Painted Rocking Chair: Part #1

I had the itch to go thrifting this weekend. Whenever I get that itch I usually find a pretty awesome score or two, any of my other thrifter’s know the feeling?

So, bright and early Saturday morning off to the thrift store I went. 

And, boy oh, boy look what I found close to 2 minutes after I walked in the door.

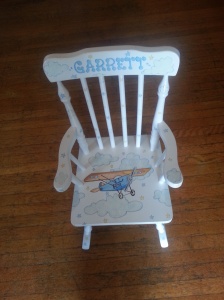
This perfect children's rocking chair.

This perfect children’s rocking chair.

My attention was drawn to it at the same exact moment that an elderly couple were admiring it. I contemplated hip checking the old man and tripping the old lady so that I could get my hands on it first (just kidding ….. maybe). 

Luckily, they admired and quickly went about their business rummaging through the .99 table.

I quickly moved in and snatched up my precious! The very first thing I thought of was the miniature wooden rocking chair that my grandmother had given to me as a child, now more than 30 years later my mother still has the chair in perfect condition at her home.

Just so happens that my niece’s first birthday is coming up in less than a week and I thought, what better gift for a first birthday than a personalized hand painted little rocking chair.

So, now I have my sketch of what I want it to look like, my spray paint, my acrylic paints and stencils and I’m hoping to be able to create a masterpiece in under 5 days.

I’ll be back in the next few days to keep you updated on my progress. Stay tuned!!
 

Wishlist Wednesday!

Hey guys, it’s Wishlist Wednesday around these here parts!

These are just a few things that I am either currently on the hunt for or am drooling over from a far (as I know my pockets just can’t afford to do it right now).

So, let’s get to it!

Remember that home office makeover that I’m in the middle of? Yeah, this one.

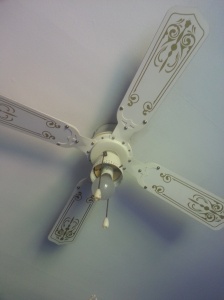
Well, I am on the hunt for a new ceiling fan for my office – the current fan is, well ….. ugly. Ok, maybe ugly is too harsh, I suppose in some past decade it was the jazziest of the jazziest but in this post revolutionary war era this bad boy just ain’t cuttin it anymore.

This ole girl is good and ready for retirement, right??

This ole girl is good and ready for retirement, right??

All of the ceiling fans at the home improvement store all look the same and just lack any character (IMO), so I headed over to one of my favorite websites – Wayfair.com. There I found both of these lovelies:

The Amhurst Ceiling Fan.  Can be found on the Wayfair.com website here

The Amhurst Ceiling Fan

This 54″ Transitional Amhurst 5 Blade Ceiling Fan by Emerson Fans found here on the wayfair.com website is super sleek and has the clean lines and mod feel that I’ve been looking for. And, you can’t beat the price.

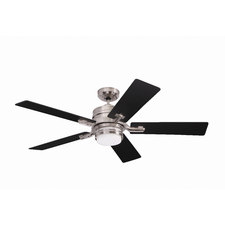
Stargate Ceiling Fan

The Stargate Ceiling Fan

But this girl here, I think I LOVE. This 52″ Stargate 5 Blade Ceiling Fan by Concord Fans found here on the wayfair.com website I think is exactly what I’ve been looking for. It’s just funky enough to fit in with the new fresh clean feel I have planned for the makeover.

I will wait until the room is just about finished (hopefully, another 2 weeks) before I make any decisions about all of the accent decor I’ll incorporate and fingers crossed the price on the Stargate Ceiling Fan will drop a bit as right now it’s a little bit more than I’d hoped to spend.

I’m a fan of Wayfair.com, how ’bout you? What great things have you picked up from there lately?

That’s what’s on my wishlist this Wednesday, but I’ll be back again next week with more of my wants.

Until next time, remember ….. Brown Girls DIY Too!


It’s The Most Wonderful Time Of The Year ……

Because I just got this bad boy in the mail …….

The 2015 IKEA catalog has arrived!!!

The 2015 IKEA catalog has arrived!!!


Don’t you just LOVE when the new IKEA catalog arrives on your doorstep?

To me it symbolizes two things:

1. Fall is right around the corner
2. It’s time to begin thinking about doing a good deep cleaning of my house (I do one every time the seasons change) and changing out the light and airy spring decor for some warm and cozy fall/winter decor.

I plan on cuddling up with this good ole IKEA catalog, a yellow highlighter to make notes on all the things I plan to purchase, and a tall glass of lemonade this cool summer evening.

I’ll definitely be back with a post of all the awesome new items in the new catalog.

What are you digging from the new 2015 IKEA catalog? Please share your inspirations in the comments.

Until next time, remember … Brown Girls DIY Too!


I Love My Local Dollar Tree Store!

Words can NOT express just how much I adore the Dollar Tree!

I mean, I can literally spend hours perusing the shelves.

My latest #DIY project is a total home office makeover, I work from my home doing freelance project management and spend the majority of my day/life in my office. Lately, i’ve been feeling very uninspired in my office and decided I probably need to freshen up my office space a bit for some new motivation.

So, for the last week I’ve been priming, sanding, deciding on paint colors, themes, freshening up my wood trim with glossy white paint, etc. 

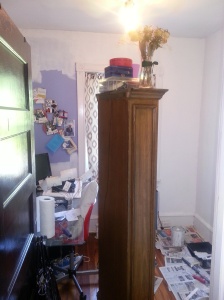
Here's my little ole office in it's current state of makeover and disarray.

Here’s my little ole office in it’s current state of makeover and disarray.

View of my desk ..... a total mess!

View of my desk ….. a total mess!

Yesterday, I made my third trip to my local home improvement store for some additional supplies. While there I thought I should pick up another paint tray since I only had one at home and still had another 3 walls to paint in my office.

I headed over to the paint aisle to discover that the price of the paint tray’s ranged from $5 – $9! Um, seriously – I DON’T THINK SO. My first thought was that I’d keep using the method I’d been using, which was lining my current paint tray with a plastic shopping bag as a liner and swapping the bag out for each paint color I used. 

Then I remembered there was a Dollar Tree in the same shopping complex – perhaps I’d be able to score a paint tray there, right?? I mean, they carry just about everything else a girl could possibly need/want, right?

So, I headed over to good ole Dollar Tree. After I spent sometime browsing the back to school items (can you believe summer is almost over!), and the cleaning supply aisle I thought there could be a possibility that I wouldn’t find what I’d come looking for. 

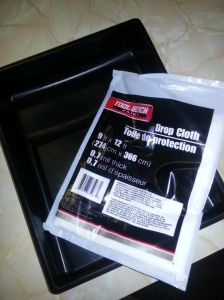
Low and behold, I rounded the corner and there they were. Not only did they have paint tray’s but they also had these plastic drop cloths that I thought I’d give a try (I’ll report back in a future post).

Paint Tray

These are just 2 of the great finds I’ve picked up lately from my local Dollar Tree. What gems have you picked up from the dollar store lately???

Until my next post, remember, Brown Girls DIY Too!


That Time I Scored 4 Chairs for $9.00 At My Local Thrift Store …..

So, I’ve already told you guys how much I LOVE trolling the thrift store, right?

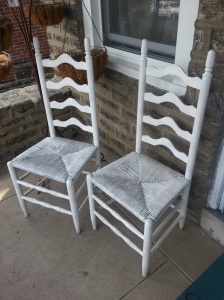
Well, there was this one time that I scored 4 of these beauties for a total of $9 bucks. SCORE, RIGHT!!!????

They've got good bones, right??

They’ve got good bones, right??

I totally had not come to the thrift store that day looking for furniture but I mean, really, how could I pass up the chance to spruce these bad boys up and sip iced tea ( oh, who am I kidding, more like Vodka) on a nice spring/summer evening.

Immediately, I began thinking about just what I was gonna do to make these babies shine. 

The more I looked at them I realized that they really did’t require much work – they were sturdy and the wicker seats were in great condition (besides the worn white color). So, I thought this will be easy, just a fresh coat of shiny spray paint and since I totally hate sitting on wicker, I would cover the seats with some funky fabric.

I threw all four chairs in the back seat of my car (still not sure how that worked, but when I find deals I get super creative about getting them home) and headed straight to my local Walmart to pick up a few cans of #KrylonBrand Ultra White Glossy spray paint. 

My next stop was #JoAnnFabrics to pick up some super funky fabric to cover the wicker seats in. Personally, I LOVE #JoAnnFabrics because they have such a wide selection of beautiful and unique fabric for great prices AND they almost always have a really great sale running AND if you sign up to receive their emails you’ll get discount coupons on just about a weekly basis.

As soon as I got home I removed the screws from the bottom of the chair that held the wicker seat into place, wiped down the base of the chair with some household cleaner to remove any dirt and dust and proceeded to spray the base glossy white.

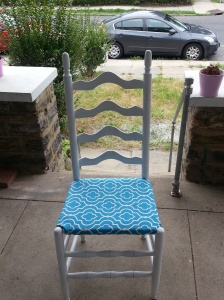
While the spray paint dried, I measured the wicker seat and used my trusty staple gun to secure the fabric to the bottom of the seat. Once the paint had dried I screwed the newly fabric covered wicker seat back into the base of the chair and this my friends was the finished product.

Pretty, right??

Pretty, right??

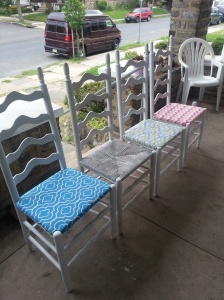
Here are a few pictures of the other 3 chairs, using the same steps I cover all four chair seats in different color/print fabric to add some funky flair to my porch for the spring/summer.

Here's 3 of the 4 chairs covered, some difference, huh?

Here’s 3 of the 4 chairs covered, some difference, huh?

I loved this project, it was super easy and just goes to show that you don’t have to spend a ton of money to create trendy, and fashionable decor for your home.

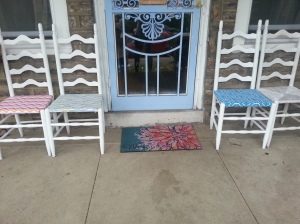
Last shot, in front of the front door. The 4th chair did eventually get covered - at the time I couldn't decide which fabric I wanted to use.

Last shot, in front of the front door. The 4th chair did eventually get covered – at the time I couldn’t decide which fabric I wanted to use.

Until my next project, remember Brown Girls DIY Too!

Welcome To Brown Girls DIY Too …..

Hey! I’m Melanie, a thirty-something homeowner from Philadelphia and I am absolutely inspired/obsessed with turning something OLD into something shiny and NEW – it’s an utter turn on however when I can do it for next to no money at all. ( I WILL TOTALLY DUMPSTER DIVE OR PICK UP DIS-GUARDED FINDS ON THE CURB ON TRASH DAY)

My daily challenge is to find ways to create beauty and happiness through the Do-It-Yourself approach. On this blog I’ll share home décor projects, craft and home renovations, both the good and the total fails.

I believe in life long learning, which means I’m constantly trying, failing, dreaming big dreams and trying to embrace all of the imperfections – all while having a blast enjoying the small things afforded to me.

Stay tuned for all of my DIY and Thrifting projects, tips and tricks!

Thanks For Reading

-Brown Girls DIY Too